
Editing some Tabular Data in Umbraco V8
Written by @marcemarc on Sunday, 14 March 2021
So this is just another modern, standard back-to-basics, blog post about a thing, no puns, no ultra-clever subtle sideshow, no allegories, nothing to read between the lines, no insights into the well of humanity on this one, oh no, not this time.
I make this clear in order to avoid regular customers from reading on and becoming disillusioned with the text - don’t worry, dear dear reader, another flight of fancy will be along soon.
But in the meantime, Tables, we’re talking tables and tabular data - and editing this data in Umbraco V8.
Editing tabular data is awkward because as we’ve discussed many times before on this blog, we’re always trying to design an editing experience that feels in harmony with how the content is eventually presented. We say ‘in harmony’ because the act of editing content IS different from that of viewing content and there are nuances involved: the source of the data, and how people feel when trying to complete the task of editing (or creating) the content, this means that a WYSIWYG or live preview accompaniment isn't always the 'best' or only way.
With tabular data and HTML tables, and Umbraco there are, it seems, lots of options...
TinyMce RichTextEditor Tables
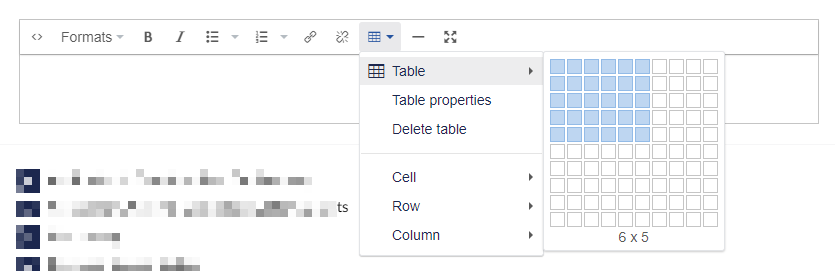
One option is to enable the ability to insert a table in a TinyMce Rich Text Editor, it’s not too bad, it’s a bit fiddly right? And how often do you end up just switching to the raw HTML to, you know, ‘colspan’ that cell… and is its outcome responsive?
Well, If you are ploughing this furrow then take a glance at these custom TinyMCE configurations, that are in my ‘goto’ things to add to the tinyMCE.config file:
<!-- Use percentages instead of pixels for table cell widths-->
  <config key="table_responsive_width">true</config>

<!-- default table attributes eg ensure a styleable css class is on every inserted table-->
  <config key="table_default_attributes">{ "border" : "0", "class": "table"}</config>

<!-- provide some default 'styles' for the table (if you are not using the css class to control this)-->
  <config key="table_default_styles">{ 'border-collapsed': 'collapse', 'width': '100%'}</config>

<!-- provide some styling choices for the editor to select when inserting the table. -->
  <config key="table_class_list">
      [
      {"title": "Responsive", "value": "table"},{"title": "None", "value": ""},{"title": "Hover", "value": "table table-hover"},{"title": "Striped", "value": "table table-striped"},{"title": "Condensed", "value": "table table-condensed"},{"title": "Bordered", "value": "table table-bordered"}
      ]
  </config>
So, it's a rudimentary way for an editor to add a simple Table, but as an implementer, in a template view you’ve lost a little control of the HTML markup, the storage of the data is wrapped ‘a little’ in its presentation.
There are of course external tools that can help generate ‘good’ HTML table markup: https://ianrmedia.unl.edu/responsive-table-generator-tool (from spreadsheets, or by manually entering data) - and the output of these editors can be pasted into TinyMce or a Macro, but there is a cognitive shift for editors when they need to move outside of Umbraco, and you start to need to know a little about HTML, which is always a good thing! - but one of the things a CMS is trying to abstract.
So how about something a bit more whizzy?
Well Anthony Dang and The Radley Yeldar Devs (which should be a band name right?) put together, last year, a specific table editing custom property editor.
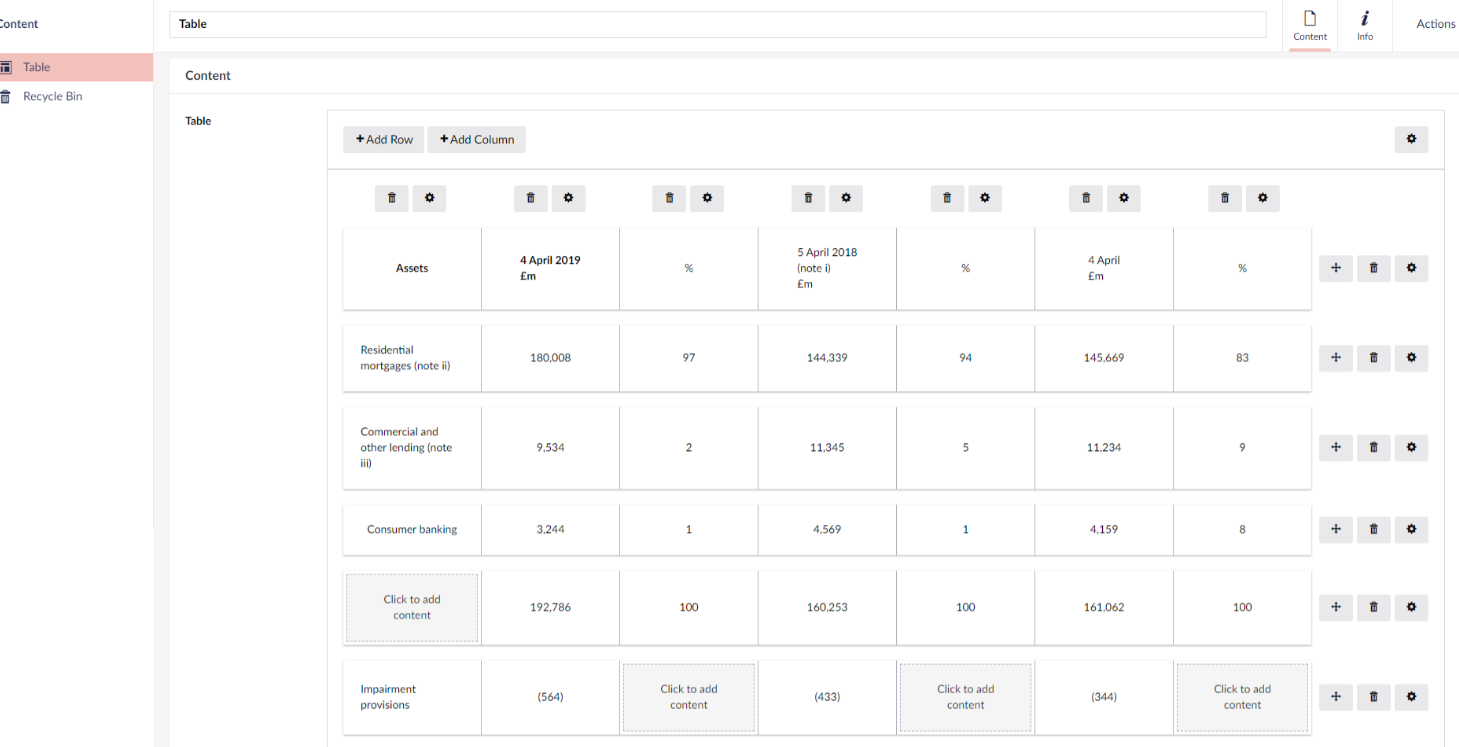
https://github.com/rydigital/Our.Umbraco.Tables
Again, it’s kind of, for building ad-hoc tables, the editor can add new rows and columns, but what’s lovely is the data entered into the table is stored and retrieved in a strongly typed way, so you can then custom build the actual table markup when displaying the table, allowing you to take into consideration responsiveness, accessibility etc - you have full implementation control.
And you could probably achieve something similar with the Grid and using a custom Grid Renderer file.
What if the table is not that ad-hoc?
These approaches though are aimed at editors adding a generic one-off flexible ‘table’, but what if you have to use the same structure table on different pages? In the context where the table has the same columns, every time it is created there is an unnecessary overhead to ask editors to recreate the same column headers each time...
And this is the scenario I encountered this week - I'm building a kind of global Product Repository in Umbraco V8, and each product, it turns out, can have a table with multiple rows of technical data - ‘the corrosivity of the product in different circumstances’. The columns and headers are the same each time it is displayed on each product - and the editor can add as many rows of data as they want, but it will probably only be about 3-4 rows per product.
The text in the table needs to be translatable, and I’m using variants for other properties that need to be translated, but it’s a bit much to reproduce the table in 20 different languages when the 'data' is the same and asking the translators to translate the same table headings on every product...it’s not the same as an ad-hoc table situation. We want the editors to focus here on the data, not the markup of the table.
Also, we'll need full control over the markup when it’s displayed, for accessibility and responsiveness, but also because the data will feed into different devices, and not necessarily a webpage - perhaps a table won't be appropriate to display the data, and we also need to query against the data - find me all the products that have x data in their technical data table.
(Aside: The products are being pushed to an Azure Search index, so as long as the data can be described in a strongly typed fashion, that level of complex querying and faceting is actually taken care of by Azure Search).
So essentially, in old money, this is probably 'just' a Nested Content repeating item, where the Document Type Element describes the ‘columns’ of the table, and the editor can keep adding new repeating content items, one for each row…
... that would be functional, but the result doesn’t feel very tabular…
We really want the editor to get a sense they are editing a table, surfacing the visibility of each row of data in the backoffice, in well, table row form… in V7 maybe we would have been creative with the use of the | character and the Nested Content name template or Stacked Content but…
We don’t do Nested Content anymore, do we?
Not in V8, it’s virtually obsoletish, and we have been politely introduced to the BlockList Editor, which can do anything…
The BlockList Editor can do anything
… but can I make the experience a bit like a table editor?
(*Spoiler*, I don’t want anybody to get tense here about whether it will or will not be possible to do this, we live in anxious times, and there is only so much jeopardy we should be expected to experience when reading a back-to-basics blog post like this - so yes, it kind of is possible, read on to find out how).
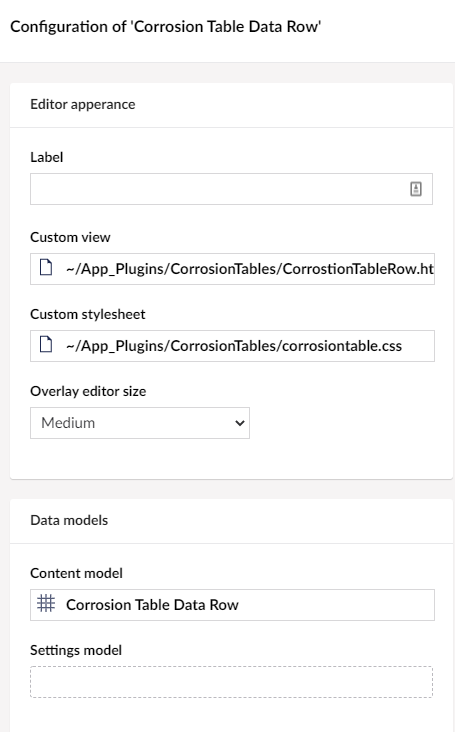
So first we’ll define our Element Type:
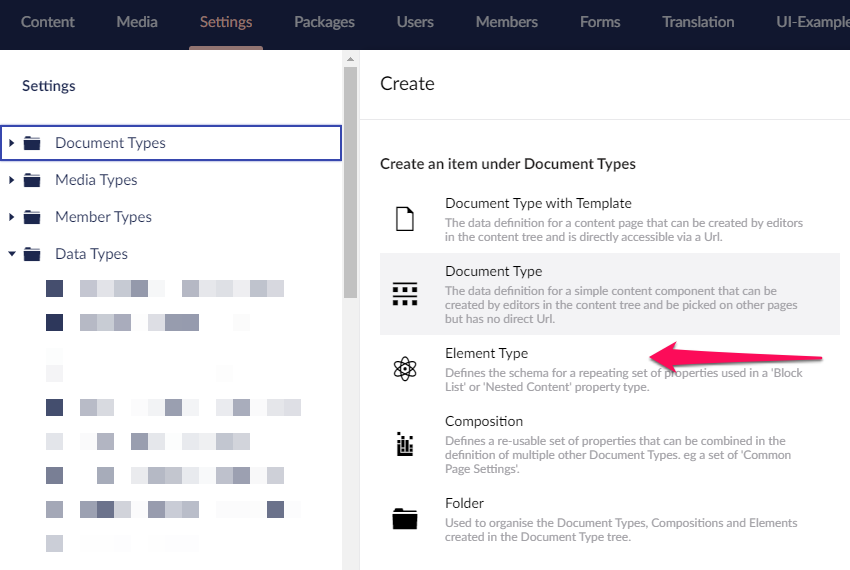
(notice the lovely menu for choosing an Element - coming soon to Umbraco V8.12… you didn't create this as a Doc Type first, and then swear, and go back in to find and tick the IsElement box... you just chose to create an Element from the menu!)
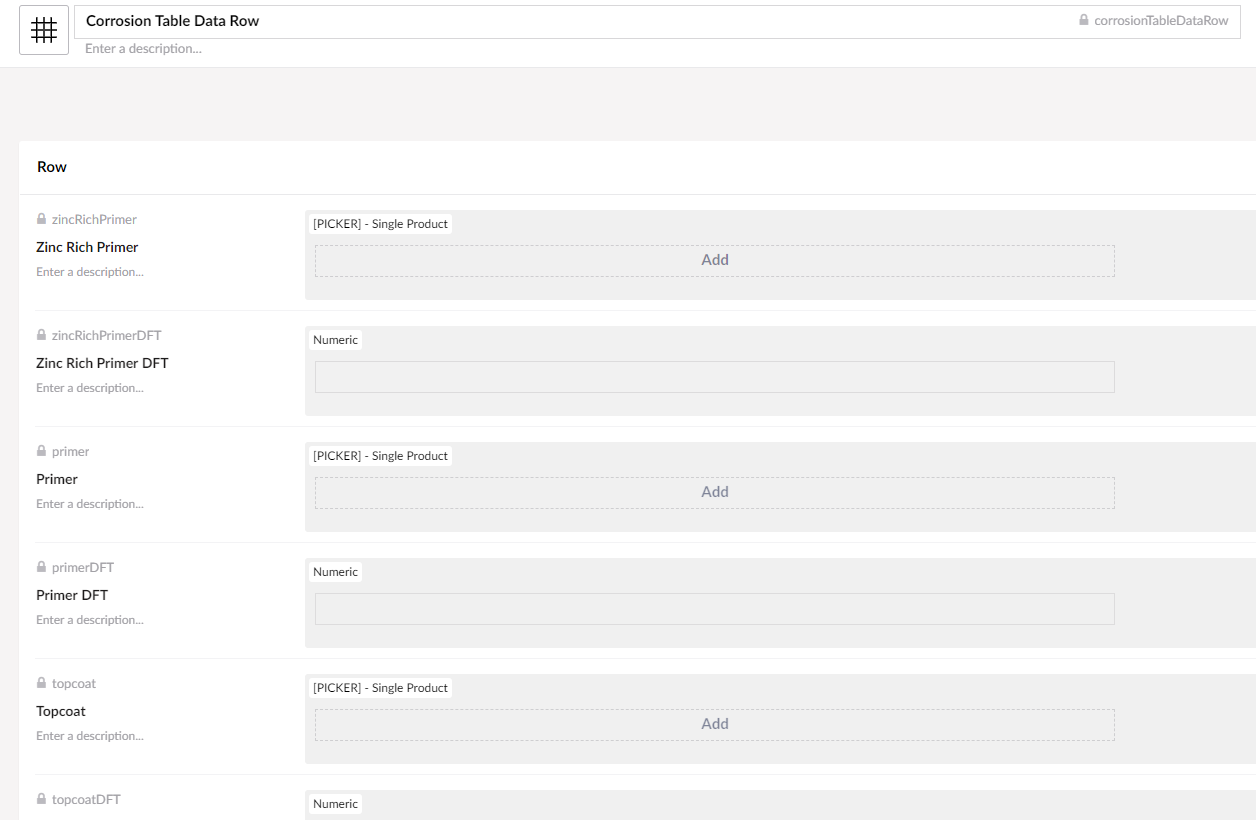
On the Element Type we set up the structure for our Table Columns, some of the column data will be links to other Products, which would all be different in different language variations - but we can make this a content picker, and calculate the links automatically, the editor doesn't need to think and make the link manually. One of the columns will be a ‘total’ of the DFT column values, so we don't need to ask the editor to calculate this - we can do the math, no you do the math, no it’s ok we’ll do the math for you...
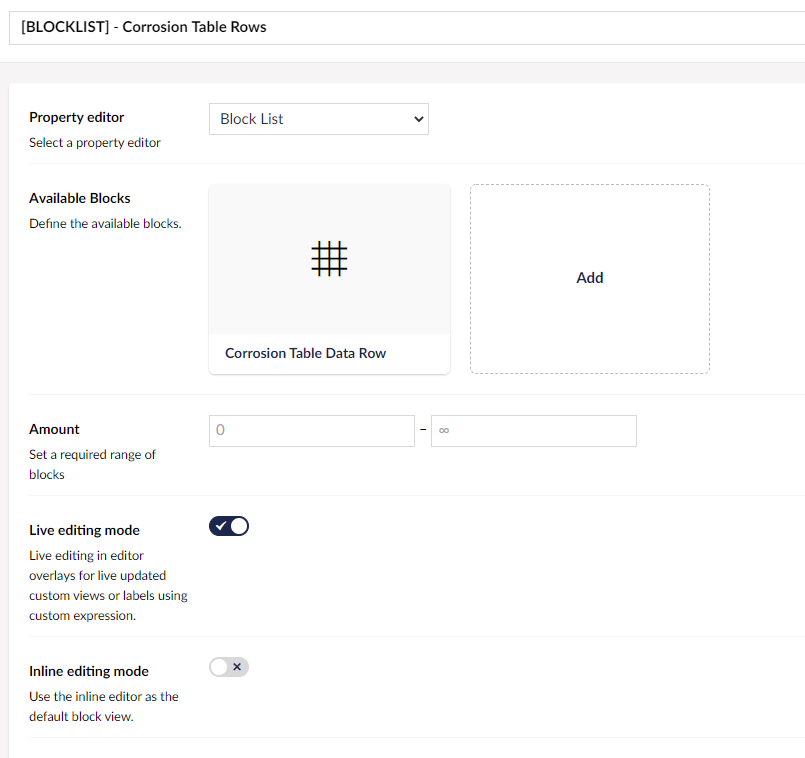
Now in our BlockList Editor we can set this Document Type Element to be the only available block…
If we set Inline editing mode to true, it will just behave like Nested Content, which we’ve already established isn’t what we necessarily want, but without that it’s just going to be ‘blocks’, not showing any data, opening up a panel to add the data like Stacked Content…
… but we can specify a custom HTML view to use when displaying each block in the backoffice, and if we set Live Editing Mode to true, we’ll see any updates in the panel, updated in real-time in the custom view, and we can associate an AngularJS controller with the view, ‘and also do the Math’...
The custom HTML view
Our custom view can be a table!
<div>
    <table class="corrosion-table" border="1">
        <tr><th>Zinc Rich Primer</th><th>DFT (µm) </th><th>Primer</th><th>DFT (µm) </th><th>Topcoat</th><th>DFT (µm) </th><th>Total DFT (µm) </th><th>Corrosivity Category</th><th>Edit</th></tr>

        <tr>
            <td> <span ng-bind="block.data.zincPrimerProductCode"></span></td>
            <td><span ng-bind="block.data.zincPrimerDFT"></span></td>
            <td><span ng-bind="block.data.primerProductCode"></span></td>
            <td><span ng-bind="block.data.primerDFT"></span></td>
            <td><span ng-bind="block.data.topcoatProductCode"></span></td>
            <td><span ng-bind="block.data.topcoatDFT"></span></td>
            <td><span ng-bind="block.data.corrosivityCategory"></span></td>
            <td style="text-align:center">
                <a class="btn btn-secondary" ng-click="block.edit()">
                    <span class="icon icon-edit"></span>
                </a>
            </td>
        </tr>
    </table>
</div>
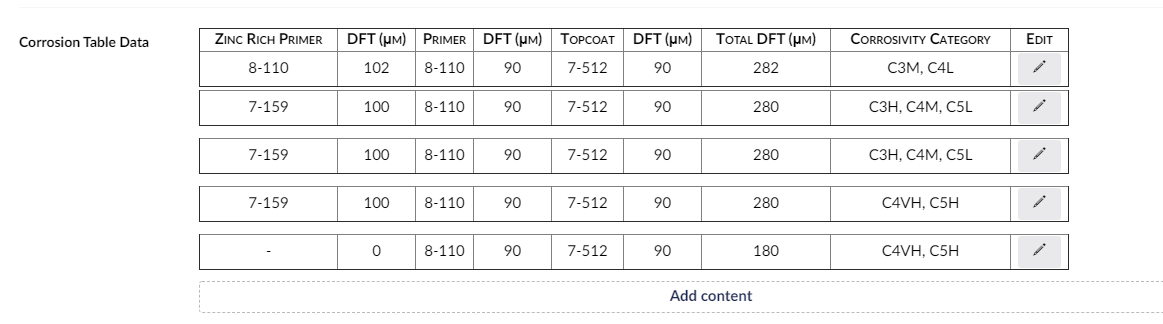
And there, the data is displayed inside a table!
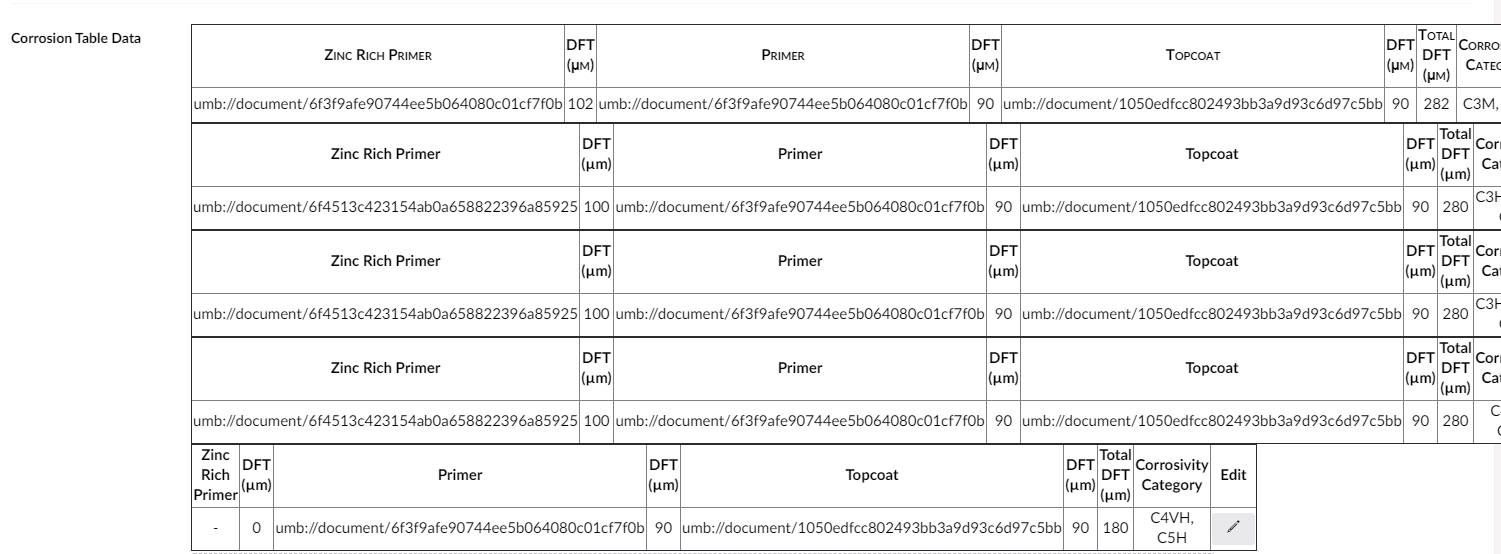
But it's a mess!
1) we’re seeing the Umbraco Udi of the picked product and we haven’t added stuff together
and
2) we’ve got multiple Tables for each block row, with a table header repeated above each row of data…
Let’s address the Picked Product problem first by adding an angularJS controller to the view
the AngularJS controller
angular.module("umbraco").controller("corrisionTablesController", function ($scope, entityResource) {

    //this method takes the values stored for the block and retrieves the 'Name' of the picked entity + does the maths
    function init() {
        var zincPrimerUdi = $scope.block.data.zincRichPrimer;
        var primerUdi = $scope.block.data.primer;
        var topcoatUdi = $scope.block.data.topcoat;

        $scope.zincPrimerDFT = parseInt($scope.block.data.zincRichPrimerDFT) || 0;
        $scope.primerDFT = parseInt($scope.block.data.primerDFT) || 0;
        $scope.topcoatDFT = parseInt($scope.block.data.topcoatDFT) || 0;
        $scope.totalDFT = $scope.zincPrimerDFT + $scope.primerDFT + $scope.topcoatDFT;

        //the mediaResource has a getById method:
        if (zincPrimerUdi.length > 0) {
            entityResource.getById(zincPrimerUdi, "Document")
                .then(function (entity) {
                    console.log(entity);
                    $scope.zincPrimerProductCode = entity.name;
                });
        }
        else {
            $scope.zincPrimerProductCode = '-';
        }
        if (primerUdi.length > 0) {
            entityResource.getById(primerUdi, "Document")
                .then(function (entity) {
                    console.log(entity);
                    $scope.primerProductCode = entity.name;
                });
        }
        else {
            $scope.primerProductCode = '-';
        }

        if (topcoatUdi.length > 0) {
            entityResource.getById(topcoatUdi, "Document")
                .then(function (entity) {
                    console.log(entity);
                    $scope.topcoatProductCode = entity.name;
                });
        }
        else {
            $scope.topcoatProductCode = '-';
        }
    }
// watch for changes and update the view when changes are made
    $scope.$watch("block.data.zincRichPrimer", function (newValue, oldValue) {
        if (newValue != oldValue) {
            init();
        }
    });

    $scope.$watch("block.data.primer", function (newValue, oldValue) {
        if (newValue != oldValue) {
            init();
        }
    });
    $scope.$watch("block.data.topcoat", function (newValue, oldValue) {
        if (newValue != oldValue) {
            init();
        }
    });
    $scope.$watch("block.data.zincRichPrimerDFT", function (newValue, oldValue) {
        if (newValue != oldValue) {
            init();
        }
    });
    $scope.$watch("block.data.primerDFT", function (newValue, oldValue) {
        if (newValue != oldValue) {
            init();
        }
    });
    $scope.$watch("block.data.topcoatDFT", function (newValue, oldValue) {
        if (newValue != oldValue) {
            init();
        }
    });
    init();

});
In our controller, we have an updateRowData() function, that will read in the Udis from the $scope.block.data property, and use the entityResource.getById method to get the picked entity, and read the value of the product code to display instead of the Udi.
We’ll want this to update whenever the $scope.block.data property is updated - so we’ll set a 'watch' on that value and call updateRowData() whenever this changes, the same with the other three fields.
And we’ll do the adding up here too, “no, you do the math, we’ll do the math” etc
Updated Html View
<div ng-controller="corrisionTablesController">

    <table class="corrosion-table" border="1">
        <tr><th>Zinc Rich Primer</th><th>DFT (µm) </th><th>Primer</th><th>DFT (µm) </th><th>Topcoat</th><th>DFT (µm) </th><th>Total DFT (µm) </th><th>Corrosivity Category</th><th>Edit</th></tr>

        <tr>
            <td> <span ng-bind="zincPrimerProductCode"></span></td>
            <td><span ng-bind="zincPrimerDFT"></span></td>
            <td><span ng-bind="primerProductCode"></span></td>
            <td><span ng-bind="primerDFT"></span></td>
            <td><span ng-bind="topcoatProductCode"></span></td>
            <td><span ng-bind="topcoatDFT"></span></td>
            <td><span ng-bind="totalDFT"></span></td>
            <td><span ng-bind="block.data.corrosivityCategory"></span></td>
            <td style="text-align:center">
                <a class="btn btn-secondary" ng-click="block.edit()">
                    <span class="icon icon-edit"></span>
                </a>
            </td>
        </tr>
    </table>

</div>
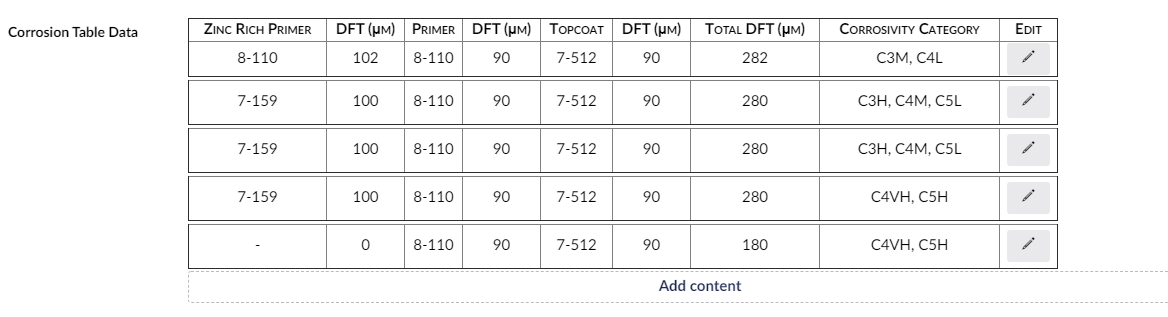
Now we have nicely updated data, and we're correctly showing the picked product code.
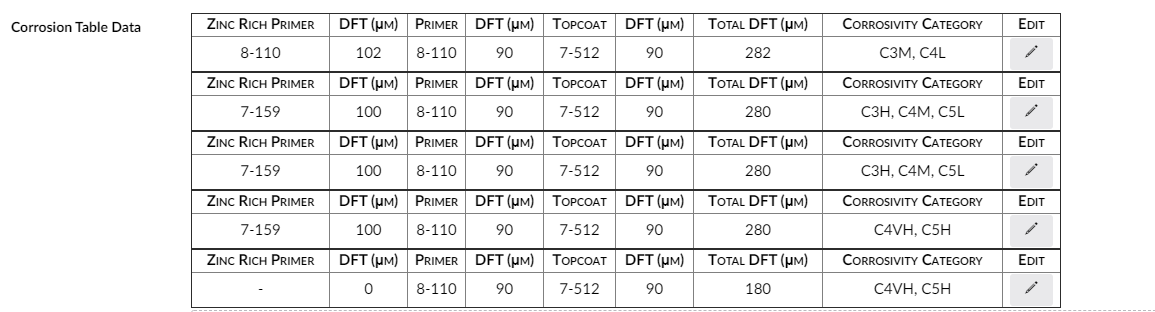
But we have a Table for 'each row'... really we want one table, and each row to be a row within it... which we can't really do, but we can fake it!
Faking a single table
Each block has an index property that lets you know where in the order of picked block properties it is, and we can use that to set a CSS class on each table’s header row.
<tr ng-class="{firstheaderrow : block.index == 0, additionalheaderrow : block.index > 0}">
So the first block will have a CSS class of ‘firstheaderrow’ and subsequent blocks will have the CSS class ‘additionalheaderrow’.
We can specify a stylesheet for the editor, and use these CSS classes to ‘hide’ the subsequent header rows - but we still want the ‘width’ of the headers to remain the same for each column, in order to fake the lining up of these columns, we'll use visibility: hidden rather than display:none and set the height to be 0 to make them disappear but retain their width;
table.corrosion-table .additionalheaderrow {
 visibility: hidden;
 height: 0;
 padding: 0;
 border-top: 0;
 overflow: hidden;
 line-height: 0;
 }
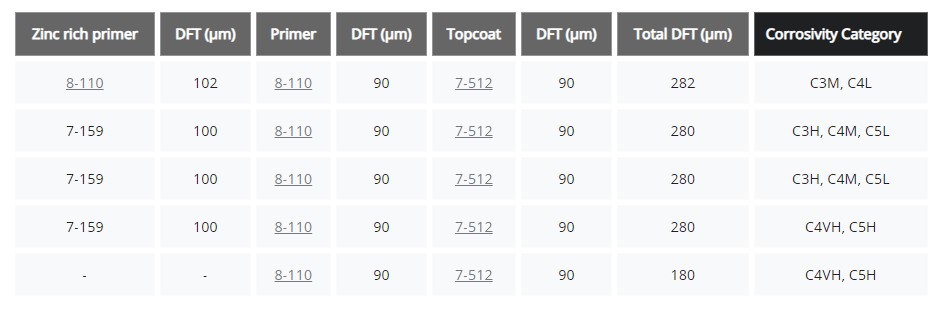
Looking more like a table! the columns are lined up but the rows have uneven gaps, this is because the BlockList Editor itself has a wrapping div for each block, with a min-height of 48px, and the rows look unevenly spaced when they are lacking their header, and there's not much we can do about that without affecting other Block List implementation, so let's work with the gap - and set the min-height on each of our custom tables to match:
table.corrosion-table {width:85%; min-height:48px}
the 'gap' is still there, but because it's consistent, the eye doesn't notice and we perceive it as one whole table - and it almost looks a little like the gap is on purpose.
Now we could have gone further, and placed text boxes in the table cells of the custom view and use those to allow the editor to edit the data inside the table, but I've preferred instead, to have the Edit link in the final column of the row, to open the pull out panel.
I agonised over this, but it comes back to being in harmony with the editing experience, and I think it’s because the editor is ‘picking’ products, which involves the slide-out panel anyway, that, it works out well that they are already focussed inside the infinite editing paradigm. If it was purely numbers that were being entered I might have tried using text boxes inside the columns for a spreadsheet-like ‘live editing’ dalliance.
Finally
I can then populate my AzureSearchIndex with a strongly typed IEnumerable of Corrosion Data Rows which are queryable.
       [SimpleField(IsFilterable = true, IsSortable = false)]
        public IEnumerable<CorrosionTableDataRow> CorrosionTableData { get; set; }
And then on the front end of the site, I have full control over the table markup to display this data, (or even maybe not display it as a table, the data is separate from the presentation)
I can follow good practice for accessibility using a <caption, and setting scope=”col” etc which are normally additional 'difficult to achieve tasks' for Editors inside a CMS table editor, and inevitable get left out, remind yourself here:
https://www.w3.org/WAI/tutorials/tables/
Also, check out the new accessibility course for Umbraco:
https://umbraco.com/training/course-details/accessibility/
So that's it, no clever joke at the end to tie it all together, sorry - but if you enjoyed this back-to-basics article don’t forget to drop a like, leave a comment, and subscribe using the link below.